
Welcome! I am showcasing the Come Sail Away Suite. I was very honored to be selected to present at Stampin' Up! OnStage Local convention and was given this suite to showcase.
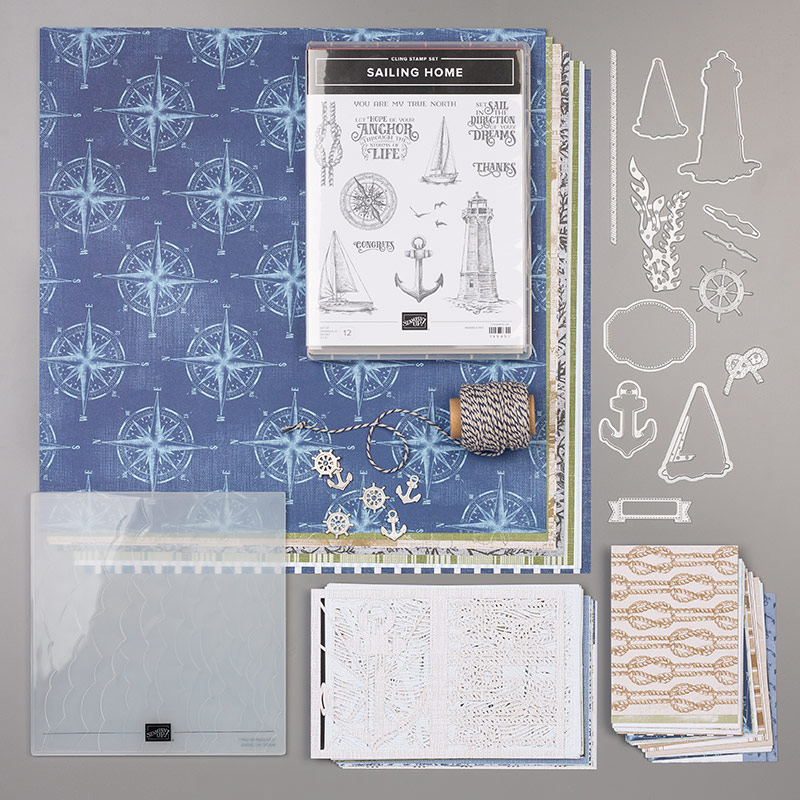
This awesome stamp set is a distinctive stamp set. What does that mean? The precision line drawings create depth and make the images look realistic.

I love to do a "progression" of stampin' abilities. The first card is for our beginner stampers. These images are wonderful for #simplestamping. Just ink and paper to create this card.
The middle card shows a little coloring around the lighthouse, a popped up punched greeting, designer series paper and then I added a Sail Away Trinket. These silver brushed trinkets are also very detailed. This is for our casual stamper.
The last card is a shaker card. This is an avid stamper's card. The lighthouse image is stamped on the window sheet. On the backside of the image, I colored with Stampin' Blends. The background in the shaker area is a Memories & More card from the suite. I also used stamps with coordinating dies to create the anchor and the greeting image.


The next set of images feature the Anchor in the stamp set and the cute saying. Just like the last set, the first card features just ink and paper for our beginner stampers and #simplestamping.
The second card, we use the same pattern of stamping, but then add some designer series paper, popped up a punched image for the saying, and added a little charm with the awesome Sahara Sand/Night of Navy Baker's Twine. This would be for our casual crafter.
 Now for our avid crafter...a little die cuts, technique, and just "more" items in the Come Sail Away suite. For the simple background technique, I stamped the anchor over and then crumpled the paper. After working the paper through, I added a little ink directly to the cardstock to make it appear like leather. Adding to the dimension, I cut out several pieces of sea weed in a couple colors, the ropes, and the saying. The rope die has great details that it really does look like rope! I added several of the die cut pieces together to make it like a ribbon across the front of the card. I attached the anchor charm to the "rope ribbon" with the baker's twine. All the dimension and texture really gives this card the WOW feel.
Another amazing trio of cards. This time featuring the sail boat and another great greeting! Like in my other sets, the first card is simple paper and ink!
In the second card, we added the Come Sail Away designer series paper. As you can see, we used the DSP on all three casual stamper cards and each one is very different. This paper is very versatile with all the wonderful colors. Adding the trinket brings just a little bling to our casual card.
The last card for our avid crafter features a few Smooth Sailing Dies and and easy technique. The dies are featured for the sail boat image and also the wheel and label. The Wheel and Label dies include details as well. On the wheel there's embossing and then the label has stitching. The "waves" were created by ripping a piece of cardstock. I started with a sponge dauber and moved the ripped piece up over the base of the card.

THIS IS MY FAVORITE CARD!!! This is more than an avid crafter...this is for the INSANE crafter! Hahaha... The technique is what I call the Sprinkled Paste technique. You take our awesome Embossing Paste (I used the shimmer version here) and create a pattern you like. I make it to look like waves. Once you have your pattern, you will sprinkle the paste with PIGMENT SPRINKLES and then spritz with water. Allow to dry (you can use the heat tool to make it dry faster but the colors are really rich when you let it air dry). After your background is completed, then you can add all the other fun stuff. I used the sea weed die with vellum and the wheel die with some glimmer paper. For the anchor I heat embossed with silver powder on silver foil paper. All of the different cardstocks and papers really add texture and detail to the card.

And of course a scrapbooking page. This page features the technique from the previous card but I used just regular Embossing Paste. The big lighthouse is from the Memories & More Card pack. It did have a rectangle around it, so I just snipped it off to add it to my scrapbook page. I added a bit of vellum to be the "light beam." To create a bit more texture, I also knotted the baker's twine. And lastly to bring in the silver from the Sailing Home Trinket, I added a strip of silver foil.
I hope I didn't overwhelm you with all of these samples from the Come Sail Away suite. Please let me know what your favorite sample is!
Please vist the other amazing suites in this BLOG HOP


- Sara - Pressed Petals https://www.lilyinkpad.com/2019/08/my-inky-friends-suite-designs-2019-blog.html
- Shelley- DinoRoar https://missmadstamper.blogspot.com/2019/08/inky-friends-suite-designs-blog-hop.html
- Rhonda- Perennial Essence https://thestampinbunny.blogspot.com/2019/08/perennial-essence-inky-friends-blog-hop.html
- Sharleen - Bird Ballard https://stampwithshar.com/?p=6323
- Elizabeth- Come Sail Away my permalink: https://stampinunicorns.blogspot.com/2019/08/come-sail-away-suite-designs-blog-hop.html


 Organdy Striped Ribbon")


 Circle Punch")


